'67-'68 Door Hinge Repair
There are three ways to remove and reinstall hinges. One way is to remove the front grille, valance and fenders to get access to the hinge bolts. The second way is to open the door and unbolt it from the car. The third way is to open the door and squeeze your hands into the space between the doors to remove the hinge bolts. Not a great set of choices, but those are it if you are going to do this job yourself.
Pulling the front grille and fenders to get to the hinges takes a lot of work, can result in paint damage and requires realignment of all parts upon reassembly. For most owners, this option is feasible only when the car is already being disassembled for repairs or a repaint.
Unbolting the door from the car is a whole lot easier than removing the front clip, and getting to the bolts this way is much easier than wiggling your hands through the narrow gap between the door and the hinge. But there are problems with this option, too. If the car has wiring in the door, the door accessories have to be removed so the harness can be pulled out before the door is unbolted. Don't even consider cutting the wires, either. The resulting splices never look factory correct and even the best of splices will corrode, as the wires are constantly buffeted by the elements.
Even after disconnecting the wires, completely removing the door means holding a fully assembled door while bolting the hinges back in. Complicating the issue is that the hinges allow the door to be moved forward, backward, upwards, downwards, inwards, and outwards so when the hinges are removed together it is much, much harder to get the door realigned than when doing one hinge at a time.
The third option, removing one hinge at a time, significantly reduces the amount of adjustments required when putting hinges back in because the door always remains connected to the body by the other hinge, but it is harder to get to the hinges. This option requires a bit of patience and some dexterity, but in the long run is typically quicker than either of the other two options, and the chances of chipping the paint are also lower.
This project can be done by one person, but a second person will make the project go faster and definitely comes in handy when adjusting a door. It should take a little less than four hours to rebuild both driver side door hinges, but plan on it taking a little more if this is the first time you have worked on door hinges. If the hinges can be rebuilt, the price can be less than $5 per hinge for just new hinge pins and bushings or $20 for the repair kit that will do one door—both of which are much better than the $80 charge for a replacement hinge.
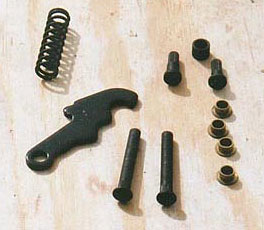
Figure 1
This is a typical repair kit for '67-'68 hinges (Figure 1). Although the kit will work on both years, there are differences between '67 and '68 hinges, so it is a good idea to compare the new parts with the ones from hinge before installing the new parts. You may have to clean up and reuse the original arm to make everything fit properly.
Start by parking the car on a level surface, then take some low-tack masking tape and put three or four layers of it on the leading edge of the door, from top to bottom. Fold each layer of the tape over and around the edge. When removing the hinge bolts, the ratchet is so close to the front edge of the door that it can hit it and chip the paint. A couple layers of tape folded over the edge will protect the paint if the ratchet brushes against the door.
With the tape in place, examine both hinges closely. Decide which one is in worse shape because that one should come out first. If they seem to be in about the same condition, start with the top one because it is easier to align the door with a top hinge that is in good shape.
This door (Figure 2) doesn't sag, but the stop pin has sheared off and the door now swings so far forward that the leading edge of the door is notched from hitting the top hinge. The bottom hinge also has some shims under it that are definitely not factory issue, so it is coming out first.
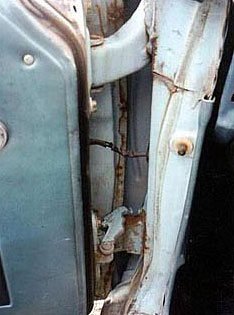
Figure 2
Properly supporting and positioning the door is the key to being able to remove each hinge one a time. For these Cougars, the most advantageous door position is different for each hinge. The best position to remove the top hinge is with the door about two-thirds open; for the lower hinge, the door should be fully open.
Open the door fully and measure the distance from the floor to the bottom of the door at the end. Place a jack stand on each side of the door with the 2x4 on top of the stands. Adjust the stands so the end of the door is supported by the 2x4 and raised by about half an inch. This will support the door when the hinge is out and the minor lift helps make sure the door ends up at the right position when the weight of the door gets put back on the rebuilt hinge later.
To aid in reinstalling the hinge, take a thin permanent marker and mark the outline of the hinge on the door. This gives a reference line to use when putting the hinge back in. A strip of tape will also work in a pinch. Remove the upper and lower bolts on both sides of the hinge first, then remove the middle bolts last. The middles bolts are easiest to remove so they are done last because the hinge will start slipping when the last bolt is loosened, which can make getting the other bolts out even harder. With the limited space, a ratcheting wrench is the best tool, followed by a regular wrench, but a ratchet and socket will fit, if just barely. Remove the last bolt from the door and carefully wiggle the hinge out. It is not easy, but it will come out with some twisting and turning.
Put the hinge in a vice, upside down. Insert a pair of needle nose pliers into the spring and compress it enough to remove the spring. Take a look at the new arm and compare it against the old one. Sometimes the replacement arm is not the same shape as the original arm. If they are not the same and the original arm isn't damaged, leave it in the hinge. If the arm must be replaced, use a small punch to drive out the retaining pin.
Next, use a small punch to drive out the hinge pin. Once the top of the head is free, the pin can be pulled out by hand. If it is still too tight and the punch will not fit all the way through the hinge, tap the pin out with a screwdriver. Use a small regular screwdriver to knock out the brass bushings, if they haven't already fallen out. Clean up the hole with sandpaper and then look at the hole in the hinge closely to see if it is still a circle. A 3/8" drill bit inserted into the opening is a good way to check the hole. A 27/64" bit is even better for the job, but that size is a little hard to come by. A little out of round on one side is typically OK, but if both ends are damaged or if one side is badly worn, it is time to look for a new hinge.
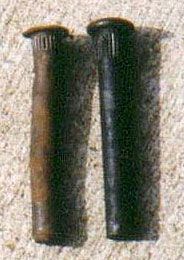
Figure 3
Would you believe that the bushings were still intact with this pin (Figure 3)? No wonder there were shims under the hinge.
Next up is the stop pin. If there isn't anything wrong with the stop pin, skip down to the rebuilding section. But if the old stop pin is broken, like the one on this hinge, it has to come out. Find the center of the old pin and center punch it. If necessary, use a file to smooth the top of the broken pin. Drill a small hole, something around 3/32", through the old pin. There is a small cavity under the old pin, so you will know when you are through the pin. Next, use a 5/16" bit to drill out the old pin. It is extremely important to not let the drill wobble when drilling out the pin or the hole will be too big and the pin will not stay in. A drill press is best for this job, but it can be done with a hand drill. Another option is to use a 19/64" drill bit to ensure the hole isn't too large.
Once the hole is drilled, clean out the hole thoroughly. Put the small sleeve on the pin, then push the pin into the hole. Hammering is not recommended, as it can bend the top of the pin or shear it off if mis-hit.
Use the vice to push the pin in place (Figure 4). With a 19/64" hole, the pin will not want to go in completely. In this case, tighten the vice as much as possible by hand and hit the body of the vice with a hammer, which will drive the pin in a little more. Alternate between hand tightening and moderate hammer blows until the pin is completely seated. This technique can break removable vice jaws, so remove them from the vice (if so equipped) for this step.
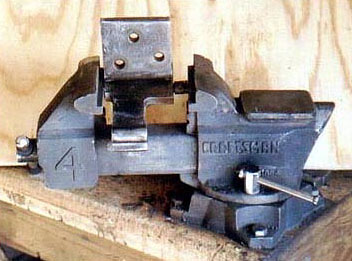
Figure 4
The brass bushings go in next. Put the hinge back in a vice, put the bushing in place, place a small block of wood on the bushing and then tap on the wood to drive the bushing in place. The wood both holds the bushing in place and prevents any mis-hits from breaking the lip of the brass bushing. The wood also absorbs the force of the hits so the brass lip isn't dented or deformed while driving in the bushing. Flip the hinge section over and drive the other bushing in place.
The arm goes back on next. Make sure the tab on the arm is pointing toward the spot on the hinge that holds the spring in place. If the arm gets put on upside down, the pin has to come out to be able to flip the arm over, and the repeated removal/install process can enlarge the hole to the point where the pin will not stay in.
The replacement arm in this kit had a hole in it that was much larger than the diameter of the retaining pin. As the kit is generic to cover both years, it may be possible that a 1968 hinge uses a larger diameter pin on the arm than what was used on the 1967 hinge. It is also possible that the wrong arm was put into the kit used here, as the arm didn't have the exact same shape as the original pin either. It was a simple matter to reuse the original arm, but it is something to watch for before throwing anything away.
Next, put the two halves of the hinge together. Make sure the spring arm is on the correct side of the stop pin before installing the pin. The pin goes in from the top of the hinge. Apply some grease to the pin before installing it. The thin space between the bushings can also be filled with grease. It will help the lower bushing more than the top, but it will also keep water out of the area. Check the hinge to see that it can move normally between the open and the closed positions before pressing the pin in fully.
Push the hinge to the closed position. Take the needle nose pliers and insert them into the middle of the new spring, with about 50 percent of the spring inside the jaws of the pliers. Compress the spring and then insert it into the hinge. One end goes into the depression on the door side of the spring and the other end goes on the tab on the arm. This completes the rebuild of a lower hinge. The new parts will rust if you do not paint them, so now is the time to do it.
Reinstallation is basically the reverse of the removal process. Wiggle the hinge in place and install all six bolts. Do not tighten them completely, just finger tight and then loosened about half a turn. For now the hinge still needs to move freely. Use the lines or tape added earlier to get the door side of the hinge back in its original position. Tighten all three bolts in the door and the middle bolt in the doorjamb side of the hinge, then remove the shims from under the door. Carefully push the door closed until the door touches the latch. Check the height to ensure the top of the door lines up with the top of the quarterpanel. If it is off, note how far it is off before putting the door back on the supports. Loosen the bolt in the doorjamb and add or remove shims as necessary to raise or lower the door the same distance it was off at the quarterpanel. Tighten the middle bolt again and recheck the fit at the quarter panel. When it lines up, tighten the other two bolts.
There is one issue that could come up when putting in the lower hinge. The lower hinge retaining plate can fall out when installing the hinge bolts. If this happens, remove the scuff plate and the kick panel to gain access to the plate and to hold it in place while installing the first bolt. There is supposed to be a retaining clip that holds the plate in place, but it was missing on this car, so the kick plate had to come off to be able to install the lower hinge bolts. The upper hinges do have tabs also, but it is easy to dislodge the plates, so take care when installing the first hinge bolt so the plates do not get knocked out of place.
With the door almost completely closed, check the fit at the bottom of the door and along the lower parts of the vertical edges. Typically this isn't affected if the hinge is aligned using the line drawn around the hinge, but it is safer to check it in case something has slipped. If the bottom of the door is too far out, it will jam against the fender. If the door doesn't line up flush with the fender and side rail, loosen the three bolts in the door and adjust the door inwards or outwards as necessary to line the door up with the quarter panel and top of the side rail, and then retighten the hinge bolts.
The process for the upper hinge is the basically the same as the lower hinge, but there is something special to watch out for on the top hinge. The shape of the hinge doesn't allow a wrench to be used, so a ratchet and socket must be used, which is why the door cannot be opened fully. It is quite easy for the ratchet to hit the door edge, and, as the bolts come out, it pushes the ratchet head towards the leading edge of the door. Extra care must be taken here to prevent the ratchet from damaging the paint, which is not an easy task when the door is partially closed on your hand. To keep the ratchet in place, hold the ratchet with one hand while using a screwdriver to hold the ratchet on the nut with the other hand. The screwdriver gets inserted into the gap between the fender and the door to hold the ratchet in place.
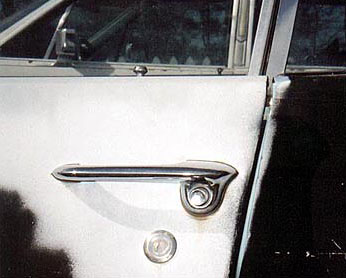
Figure 5
Repairing an upper hinge is easy: Simply drive the old pin out and knock out the old bushing. Clean up the opening and check it for roundness, and then insert the bushings and new pin using the same steps used to insert the pin in the lower hinge. As with the lower hinge, the pin goes in from the top. Use the same steps outlined for the lower hinge to install and align the upper hinge. When both hinges are back in the car, use a small rag dipped in household rubbing alcohol to remove the alignment lines drawn around the door side of the hinges.
With the repaired hinges in place and readjusted, the door now lines up with the quarter panel, doesn't require slamming to close, and doesn't sag or pop when opening or closing the door (Figure 5). This door is open (Note the shadow on the quarter panel) but it now opens and closes perfectly due to the newly redone hinges.
Bruce Habel is the DCC Technical Adviser. He may be reached at restocat@earthlink.net