Chassis Lube 101
Lubing the suspension and steering is a task often neglected because most people believe it to be a difficult, messy job. The truth of the matter is that lubing the suspension is no more messy than changing the oil and uses many of the same tools.
Doing a lube job on a Cougar can be done in about 30 minutes and the only special tool needed is a grease gun, available at auto and department stores for about $25. Beside the grease gun, the other tools needed are a jack, a set of jack stands and some clean rags. In some cases, a creeper can make the job go faster, but it isn't required and a creeper requires that the vehicle be raised higher to get the clearance to use one.
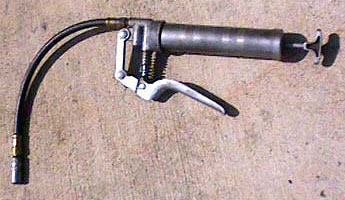
Figure 1
A grease gun (Figure 1) is a simple tool—push it onto the grease fitting and squeeze a couple of times. There are several types of grease guns. This is the pistol grip style, which allows for one-handed operation. This particular grease gun has the optional rubber hose instead of the straight metal tube that comes with most grease guns. The hose makes it easier to get the end in tight places.
There are a couple of important details to know to do a proper lube job. The first is how to properly install the grease gun on a grease fitting, commonly called a grease "zerk" or just a zerk. The second is to know how much grease to put in. The third is to know all the points that need to be greased.
The first step in installing a grease gun is to clean the zerk. All old dirt, oil and grease on the zerk must be wiped off before attaching the grease gun. Otherwise, the dirt will be forced into the ball joint along with the new grease. Zerks are easy to clean—just take a dry rag and wipe the zerk down. Once the tip is clean, simply push the tip of the grease gun straight onto the zerk.
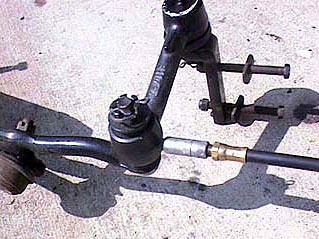
Figure 2
Grease will not flow into the zerk if the tip is at too sharp of an angle. The tip of the grease gun should be parallel with the centerline of the zerk for the grease to flow through the zerk and into the joint (Figure 2).
With the tip properly on the zerk, a little grease will go in each time the handle is squeezed. For many ball joints, it is easy to tell if enough grease has been added because it will start pushing out old grease from underneath the seal. This is because many seals today are a simple rubber cap that is pushed over the stud. When grease starts coming out from under the cap, the joint is fully lubed. However, some seals are truly sealed. They have a metal ring or plate that prevents anything from getting in under the bottom edge of the seal. The ball joints in the upper A-frame and the lower control arm typically have this type seal. When adding grease to one of these type seals, it is important to watch the seal closely to prevent overfilling. For these type seals, watch the seal closely. When the seal starts to bulge slightly, it has enough grease. I repeat: When the seal starts to bulge slightly, it has had enough. Do not pack these type seals full of grease. The seal must be able to move and compress as the suspension operates and overfilling them will cause the seals to burst when the suspension moves.
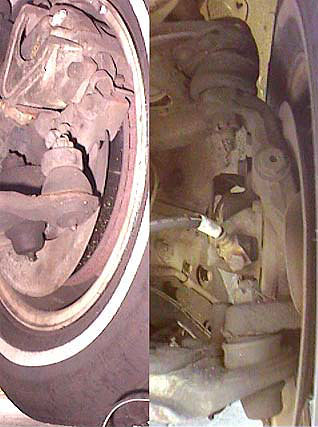
Figure 3
The tie rod on the left has an open seal while the ball joints on the right have closed seals (Figure 3). Feeling the closed type seal before starting and checking it after every two or three handle operations also helps ensure that enough grease is added without adding too much.
Now that you know how to use a grease gun, the next issue is where to use it. The lube points are the same for most cars; typically if a part has to move or rotate, it has a lube point. For our Cougars, this means the front suspension, the steering components and drive shaft U-joints. This handy chart lists all of the places that need grease—print it out and check off each as you go. Note that some of the places listed may not have a zerk installed. Some came from the factory without zerks or came with the holes plugged with a small bolt. On the flip side, some stock replacement parts and high performance parts can have zerks that the factory parts never came with.
The A-frame has three grease points. The ball joint (green arrow, Figure 4) is easy to get to. The A-frame shafts, which have two grease points, are another story. A stock 90 degree zerk (red arrow, Figure 4) ends up too close to the frame to install a grease gun on them so most A-frame shafts came from the factory without zerks. Special aftermarket zerks are now available to overcome this problem, so there isn't a reason anymore to skip lubing the upper A-frames or to blow torch holes in the shock towers to use straight zerks.
To lube a car, park the car on level ground and put the front of the vehicle on jack stands or a pair of ramps. Jack stands are definitely preferred, as they allow the wheels to be turned, which makes access to the grease points on the A-frame shafts much easier to get to. But ramps will do the job, too.
In addition to the common lube points on the A-frame, the ball joints and tie rod ends shown earlier, the power steering control valve also should have a lube point under the ball stud (red arrow, Figure 5).
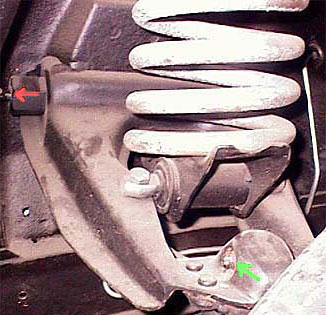
Figure 4
With the front of the car on the stands, pull the driver's side wheel to the left. Wipe the front upper A-frame shaft and the upper ball joint zerks clean, then attach the grease gun and lube these points. Wipe away any excess grease when the gun is removed. Turn the wheel to the right and repeat the process for the rear A-frame shaft zerk. Repeat the process on the passenger's side A-frame.
The next step is to go under the car. Lube both of the lower control arm ball joints, then move on to the steering. Start at the driver's side and move across the car. The simplest sequence is driver's side outer tie rod, power steering control valve or manual steering center link, driver's side inner tie rod, power steering power ram, passenger's side inner tie rod, idler arm and passenger's side outer tie rod.
Sometimes the power steering power cylinder and even the idler arm (shown earlier) have zerks on them, although most of the time these parts do not (Figure 6).
The last items on the list are the U-joints. These can be hard to get to, but they shouldn't be skipped. Unfortunately, it does sometimes require moving the car to rotate the U-joints so their zerks are accessible. If this is the case, always check both zerks before moving the car, sometimes you can get to one but not both, and moving the car could block access to the one that was reachable before moving the car.
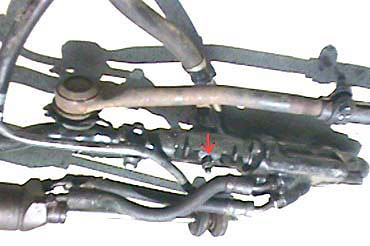
Figure 5
Most U-joints have zerks also, although it can be a big hassle to get the grease gun on them (Figure 7). Extreme cases may require rotating the drive shaft (moving the car) but usually some pressure and wiggling will get the grease gun on the zerk enough to add grease.
Before coming out from under the car, check each of the lube points to ensure that all the excess grease has been wiped away. Once that is done, the car can be safely lowered from the stands and the project is done.
What! No Zerk?!
What do you do if you get under the car and find there isn't a zerk? Well, it depends. If the part in question has a small bolt in it, it can be removed and a zerk installed in its place. However, some parts not only do not come with a zerk, they don't even have a hole to install one. For these parts, all you can do is watch them and replace them at the first signs of wear. Also, if this is a restoration, installing a zerk may detract from the car's originality. Fortunately, this only applies for cars in the most senior levels of competition, so adding a zerk won't cost you any points in most classes.
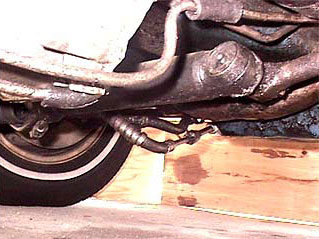
Figure 6
Zerks are available at any parts store and many department stores also carry them in their parts section. Standard zerks comes in three shapes, a straight, a 45 degree, and a 90 degree and will work in fine in all locations except the upper A-frame shafts. The upper A-frame shafts require a special zerk available from most Cougar and Mustang vendors. While a 90 degree fitting will fit in the opening, typically there isn't enough space to get the grease gun on the zerk because it is too close to the shock tower wall. The special zerks extend the end out enough to overcome this issue.
For most locations, the straight fitting (Figure 8) is the easiest to install and use. U-joints and upper ball joints almost always have straight zerks because of clearance issues. The 45-degree fittings are nice on lower control arm ball joints, outer tie rods, and PS power cylinders because they point the end away from the ground or the car. The 90-degree fittings are used on the upper control arms and similar places where there is something blocking direct access to the fitting.
Installing a zerk is simple. Clean the part around the small bolt before removing it. Hand-thread the zerk until it starts in the hole, then use a wrench to tighten the fitting. It is not necessary to tighten the zerk until it is flush against the part, it just needs to be tight enough not to fall out. The threads are tapered so once you have to use a wrench to turn the zerk, they will stay in the hole. With the angled zerks, tightening completely could result in the zerk not pointing in the right direction. So, for angled zerks, just get then snug and then turn them just enough so you can access them.
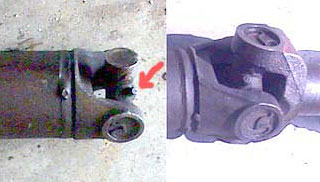
Figure 7
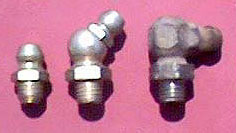
Figure 8
Unfortunately, the special zerks for the A-frame shafts require a lot more work to install. Installing them requires compressing the coil spring, removing the spring and unbolting the upper A-frame from the shock tower to get the room to install them. But once you get them in and keep to a proper lube schedule, expect many years of squeak-free driving, along with an extended life from your suspension and steering components.
Bruce Habel is the DCC Technical Adviser. He may be reached at restocat@earthlink.net