Replacing a Water Pump
Changing a water pump has the somewhat deserved reputation of being a nasty job. Although it can be a dirty job, "nasty" refers more to the problems typically encountered when replacing the water pump than the amount of crud that tends to collect on and around it.
Corroded openings and sheared-off bolts are common problems, and there isn't a lot you can do about them, either. But when installing a new water pump, you can take some preventive measures that can reduce the headaches if the water pump ever needs to be replaced again.
The particular engine here is a 1991 5.0 HO now in a 1969 Cougar driven by my wife, Donna. This engine received a new water pump about two years ago, when the engine was first purchased, so it shouldn't have had died this soon. But it did, and now I have to replace it. Lucky for me, some of the installation tips used here were used when this pump was installed, so it came off of the engine without a problem. With its 5.0 brackets and serpentine belt, the engine in the accompanying photos might not look much like the one in your car. But the process for replacing a water pump on a classic Cougar is much the same as described for this newer engine.
The first thing to do is make sure the water pump is, in fact, faulty. Usually this isn't hard. Defective pumps usually leak water from one of the weep holes or from the front bearing. While coolant sitting on the timing chain cover might be a bad water pump seal, it also could be a bad thermostat gasket, a bad upper radiator hose or a bad water pump gasket. It's important to do some investigating to verify the water pump is the problem—because old water pump bolts tend to shear if they have been in place for a long time, you don't want to remove the pump unless you absolutely have to.
If the pump is faulty, the only way to fix it is to replace it. Most parts stores will have a replacement pump for your car in stock or be able to get one within a day or two. Because of the variations in Ford small blocks, it is important to compare the new one to the old one. Pre-1970 small block water pumps have the lower inlet on the opposite side as the 1970 and newer water pumps. Serpentine belt system water pumps look virtually identical to regular water pumps, but will not cool the engine because the vanes are designed to pump the water in reverse compared to a V-belt water pump. These differences make it important to compare the two water pumps before the new one is installed.
As with most projects, there are several "might as well do it while I'm here" tasks in this area, too. If you do not know how old the hoses are or how old the belts are, now would be a good time to replace them. All the belts have to be removed to get the water pump out, as does the lower radiator hose, so there isn't a lot more work involved, just the cost of replacing the belts and hoses. It also is a good time to clean and repaint the power steering and alternator brackets, if they need it.
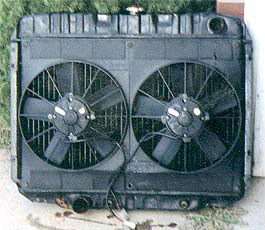
Figure 1
Although not required, the job is much simpler if the radiator and fan shroud are removed, so start by draining the radiator. The simplest way is to open the drain cock and put a pan under the driver's side radiator support. Put a piece of rubber hose on the drain cock so the fluid will not drain onto the radiator support but instead go directly into the pan. Disconnecting the lower radiator hose will drain the radiator more quickly, but tends to spill a lot of coolant. While the radiator is draining, loosen the mounting bolts for the power steering pump and the alternator. Also loosen the air conditioning idler pulley, if equipped with AC. All the belts have to be removed to get the water pump out. After the belts are loose, remove the four bolts holding the fan to the water pump. Usually a 7/16" wrench does the job, although I have seen some fan bolts that required a 1/2" wrench. If you are going to leave the radiator in, remove the four fan shroud bolts and remove the fan and shroud together. Otherwise, disconnect the transmission coolant lines from the radiator (automatic transmission cars only) and remove the radiator, shroud and fan together. Use large rubber vacuum caps to cap the transmission lines. Small vacuum caps can be partially inserted into the lines to seal them but be careful not to push them in too deeply.
With an aftermarket electric setup like this (Figure 1), the simplest solution is to remove everything together. If you leave the radiator in, put a piece of cardboard against the radiator to protect it from wrenches, not to mention your knuckles.

Figure 2
With the fan and radiator out of the way, reach in and remove the belts and the idler pulley. Next remove the lower bolt on the power steering pump bracket, the one used to tighten the belt. Remove the two bolts on the right side that hold the power steering pump bracket to the water pump. Because water pump bolts are different lengths, it is important to keep these bolts in the proper order. One way of doing this is to take a piece of cardboard and punch holes in it in the rough general shape of the water pump, one hole for each bolt being removed (Figure 2). As you remove a bolt, put it in the corresponding hole you punched into the cardboard. Sketching the location of the hoses also makes for a good reference.
After the two power steering pump bracket bolts are out of the way, loosen the upper bolt, the one that holds the pump to the engine. Hold the power steering pump in place while removing this bolt and bracket. Slide the bolt out of the bracket and then reinsert the bolt to hold the power steering pump in place. Getting the pump lined up and reinserting that long bolt is usually tougher than it seems, so holding the pump in place keeps everything lined up and makes reinserting the bolt easy.
Next, remove the bolts holding the alternator brackets to the water pump. Put these bolts into the cardboard and then rotate the alternator towards the battery. After turning the upper bracket so it also clears the water pump (point it upwards), lightly tighten the upper bolt to hold the alternator out of the way. The lower bracket can hang by the bolt on the bottom of the alternator or it can be removed if it still sticks out in front of the water pump.
Remove the lower radiator hose and the two heater hose lines. The bypass hose is made of formed line and may not come off yet, but at a minimum loosen the clamp and try to get the hose loose from the fitting. With the hoses loose, remove the rest of the water pump bolts, inserting them into the cardboard as they are removed. Resist the urge to clean the bolts as they come out, you will want to examine them as a set later. Once all the bolts are out, the water pump can be pried from the timing chain cover.
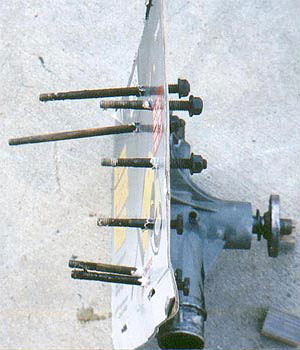
Figure 3
The water pump bolts—one of virtually every size (Figure 3). Get one wrong and it will seat on the bottom before it tightens on the pump or only one or two threads will engage and it will come loose on your next excursion.
Pull the new pump from the box and place it beside the old pump. Confirm that all the inlets and outlets are in the same place. Turn the pump over and remove the two bolts holding on the backing plate, being careful not to damage the gasket on the new pump. Check the impellers and make sure they are the same (general) shape. A reverse rotation water pump will have the blades opposite from a normal water pump and although it will bolt up, it will not cool the engine. Once the new water pump checks out, put the gasket back in place and bolt the rear cover back on.
Now is the time to paint the water pump. Typical replacement water pumps are made of cast iron, so they have to be painted or they will quickly rust. Wash the housing with some dish soap (Simple Green works well) to remove any grease or oil on the exterior, let it dry and paint it to match or cover it with clear to prevent rust. Do not paint the back side of the pump; the paint will interfere with the seal of the gasket.
While the paint is drying, use a scraper and remove all the old gasket material from the timing chain cover. Insert shop towels into the openings to prevent the scrapings from falling into the water passages. If the surface is heavily pitted, use a wire brush to clean out the corrosion, old gasket and sealant in the pits. As the surface is aluminum, a hand held wire brush is best, although careful use of a drill-mounted brass wire brush at a low speed is acceptable. A wire wheel of any type on an angle grinder is a big no-no, it will eat the surface away. When all the old gasket is removed, I take a sanding block and go over the surface with 220 grit sandpaper. The intent here is to remove any last material and give a uniform and flat surface. You don't want to remove metal, so sand lightly until the surface looks clean. If you sand, always use a block to keep the surface flat.
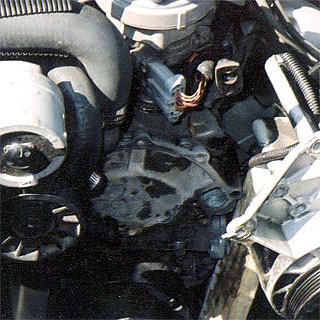
Figure 4
Removing the old gasket from the timing chain cover is usually the most time consuming part of this project (Figure 4). When the cleaning is complete, remove the rags inserted into the openings. Check the openings to ensure nothing fell in when the rags were removed and that all the rags came out. Anything left in these openings will clog up the cooling system, so thoroughly clean out these openings.
Next, take a look at the water pump bolts. While they all may be rusty, some will be worse than others. Look closely at the ones that were damp. They are easy to find, the cardboard will be stained where the bolts touch it. Examine the opening in the timing chain cover around these bolts for damage and leaks. While all the holes need to be cleaned out, the holes that had leaks need extra attention. Clean out all the holes. A tap works best, but unless you're willing to also remove the timing chain cover or have one of the extra long ones, it isn't going to be long enough to reach all the threads. Spray carb cleaner into the openings to wash out any loose garbage. Use the straw to get the cleaner as deep into the opening as possible and drape a rag over the top of the straw to prevent spraying rusty crud all over the engine bay. I also thread the longest bolt in and out a couple times during the cleaning process to break loose as much crud as possible.
Wash the front of the timing chain cover down one last time with carb cleaner to remove any debris and oil from the surface. Wipe it dry to remove the crud and any spilled coolant. Apply a thin bead of Permatex around the water openings. Thin is the key word. The Permatex is there to fill in any pitting and help improve the seal, but too much and you will have some Permatex squeezed into the water passages, which can break loose and mess up your cooling system. If the openings in the timing chain cover are not pitted, the Permatex can be skipped. Otherwise, apply a coat around the openings, spread it out evenly and wipe away the excess. Also wipe away any around the inside of the openings. While the Permatex is drying, wipe the bolts down and apply anti-seize to the threads. Insert a bolt at the top and bottom (Hold the pump by the shaft to avoid getting finger prints in the paint), put the gasket in place, and put the water pump in place. Slip the bypass hose onto the fitting now, but leave the rest of the hoses off until later. Insert all of the bolts finger tight, except for the bolts that hold on the power steering pump and alternator brackets. The power steering pump bracket covers one water pump bolt, so it is important to torque that one down before installing the power steering pump bracket.
Torque all the bolts that are currently installed to the recommended specifications (20-25 ft-lbs for 390s and 428s, 12-15 for everything else), then install the alternator and power steering pump brackets. Be careful when tightening the top bolts—they go into the aluminum timing chain cover instead of the cast iron block and it is quite easy to strip the threads out. When the alternator and power steering pump brackets are back in place, then the water pump bolts that go through them can be tightened.
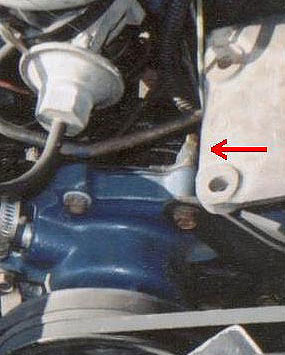
Figure 5
This timing chain cover has had a rough life (Figure 5). Both of the upper water pump bolts that protrude through the cover have nuts on them. This solution will keep the water pump on, but it doesn't look all that great. Keep Arnold in check to avoid this problem.
With the water pump back in, reconnect the heater core hose and tighten the heater hose and bypass hose clamps. Put the lower radiator hose on the pump and get the clamp snug, but do not tighten it yet. Install the radiator next. Once the radiator mounting bolts are tight, install the lower radiator hose and tighten both clamps, then reconnect and tighten the two transmission lines. Put the idler pulley back in place, making sure to line the holes up with the ones in the water pump shaft. The fan and shroud go in next. When those are in and all the bolts tightened, the V-belts can be put in place and tightened.
On the power steering pump, I put a breaker bar between the snout of the pump and one of the bolt heads. That way I can pull the belt tight without applying any pressure on the thin power steering pump housing, which bends easily and then leaks forever afterward. On the alternator, a bar about 18 inches to 24 inches long inserted from underneath seems to work best, although it can be done from the top. As most alternators have aluminum casings, I put the bar in the center against the iron housing. Except for the odd '67 setup, the AC is easy—just put a half-inch breaker bar into the square hole in the idler housing and pull. Be careful not to overtighten any of the belts.
The front bearing on this pump failed due to excessive belt tension (Figure 6). If you're lucky, you will hear the rattle before it gives out. But more likely, the only indicator will be an overheating engine when it throws the belts and dumps the coolant out of where the front bearing used to be.

Figure 6
Install and tighten the upper radiator hose, make sure the drain cock is closed and fill the radiator with new coolant. Put the radiator cap in place, do one last check around the engine bay for tools and then start the engine. Look around for leaks, then remove the radiator cap. Do this before the engine has warmed up! You want to remove the cap before the thermostat has opened. Check the fluid level. If it has dropped, add fluid until the tank is about halfway full. Keep watching the fluid level until the thermostat opens. Don't put your face over the opening, look in at an angle so if coolant sprays out just when you start to look, it won't spray into your face. (I've never had a radiator spray when the thermostat just opened up, but why take chances?)
The opening of the thermostat usually is indicated by the sudden appearance of foam in the radiator, by the coolant starting to flow inside the radiator instead of just standing in place or by the fluid level dropping. If it drops or foams, add fluid. If it just flows, the amount of coolant is about right. If you are uncomfortable with opening the cap with the engine running, instead let the engine get to temperature and then turn the car off. When the engine cools, open the cap and then fill the radiator.
And The Fun Never Ends (or, "Oh &#@!, the bolt broke")
All too often, coolant will leak into the bolt passages and corrode the bolts. Unfortunately, the most common way you find a damaged bolt is when it shears off. If you are only a little unlucky, the remains of the bolt will stick out the timing chain cover when the water pump comes off. Sometimes these bolts can be sprayed with penetrant and removed with a pair of vice grips. Otherwise, the timing chain cover has to come off to get to the broken bolt, which is beyond the scope of this article.
Keep this in mind when replacing a water pump. Although replacing a water pump takes less than four hours, if something goes wrong it can turn into a multi-day job, so don't plan on replacing that leaky water pump the night before the show. Also, due to their length, some water pump bolts are not readily available at a parts store. An emergency fix is a quick trip to a local parts yard. A better fix is to order a new set.
Bruce Habel is the DCC Technical Adviser. He may be reached at restocat@earthlink.net