A Voice of Experience on Suspension Upgrades
They said it would be a four- to six-hour job…
Sooner or later your classic Cougar or Mustang is going to need new front suspension. After 40 years, rubber bushings and ball joints are going to be worn out many times over.
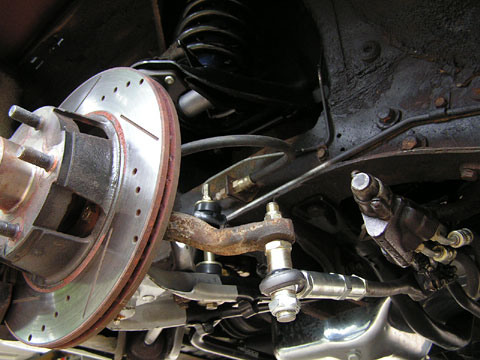
For me, it started with my steering, which began to degrade fast. I replaced the tie rods with a bump steer correcting set up from Total Performance. Although the tie rods fixed one problem, the rest of the front end was on its way out fast. As I would take gentle turns, I had to keep both hand on the wheel because it would occasionally jump to one side without warning.
Just as I had tried to improve the steering with a bump steer kit, my goal was to improve on the original suspension while I was fixing it. There are many options to go with for the front suspension of your classic Mercury or Ford. You can spend as much as you want. If you are building a car for road racing, there are full coil over suspension set ups. There are also some great tubular control arms that will eliminate any flexing and reduce your unsprung weight, resulting in improve handling. These options were outside of my budget, so I chose a Grab-a-track front suspension kit from Mustang Plus. I have some friends who tried similar kits from other companies and found the ball joints wore out in less than a year (do some searching on the Internet and you will find this issue).
The Grab-a-track kit has stock style control arms, but has polyurethane bushings to effectively eliminate the flex that come from stock rubber bushings. My kit also came with 1968-and-up-style strut rods. My car, being a '67, had articulated strut rods, which were used only that model year for Cougars and now are not widely available in the aftermarket parts world.
To further the performance improvements, I ordered the 620 front springs, as well as spring perches from Mustangs Plus that lowers the vehicle about an inch. Even though these are called 620s, they are actually rated at about 540 lbs. Mustang Plus offers a 750 series spring that is actually a 750-pound spring recommended only for racing. I also got a 1 1/8 inch front sway bar, to keep things level in the turns.
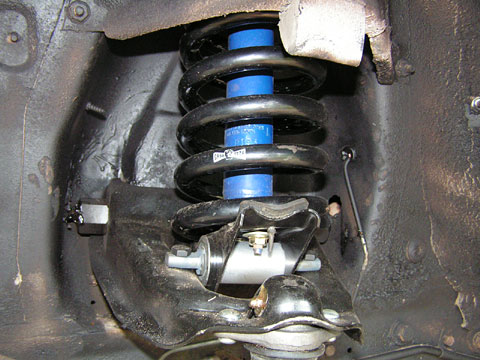
To make all these parts work even better, I decided to lower the upper control arms 1 inch, the way Shelby did on the 1965 and 1966 Shelby Mustangs. This was a trick passed along to Shelby from Ford engineer Klaus Arning, who also designed the suspension for the GT40. This trick improves the camber and keeps the tires flatter on the pavement during cornering, resulting in better grip through the turns. The control arm drop also lowers the car another 5/8 of an inch.
I started this piece by saying "so they said it would be a four- to six-hour job." My reality was a little different—more like 17 hours. Now if I were doing it again or I had an extra set of hands turning wrenches, I'm sure I could shave three to four hours off that time. Any way you cut it, know going in that it is a big job. On the up side, don't let this job scare you either, it is not rocket science and it just takes some elbow grease (real grease) and patience.
Most of the tools to do this job are standard stuff for most shade tree mechanics, but there are a few specialty items you will need to have on hand. One is a spring compressor, which you can rent from a local auto parts store. You will also need some large open end wrenches that go up to 1 1/8". Believe it or not, the most used tool in this whole job was by trusty 3-pound sledge hammer. You do an amazing amount of whacking things hard (it's a good stress reliever). Of course, you will need a good socket wrench set, jack stands and a large block to support the brake rotor while the control arms are being replaced.
Detailed instructions on how to do the Shelby control arm drop is widespread. You can find this on the Internet, magazines and books. Most of these sources will have a template you can use. I ordered a pre-cut metal template and the required 17/32" drill bit from the DazeCars Web site.
The template will give you a 1/8" hole to drill the pilot holes. From there, you use every drill bit you have to gradually go up to a 1/2" and, from there, you hone it with 17/32" bit. You will be drilling through three layers of thick steel. Don't even think about using that nice battery powered drill on your workbench. I wasted a couple hours on this misconception before I went out and bought a powerful plug in drill with a half-inch chuck. You will need this size chuck to handle these large bits and you will need lot of power to get through the steel. I bought the house brand drill from Home Depot for about $60. Remember to use lot of WD40 or similar lubricant as you drill to keep from overheating your bits.
Another little tip is to grease all your points on the control arms and ball joint before you install them. Particularly the upper control arm grease fittings, which are nearly impossible to get to once bolted up.
If you have read this far, you are already armed with the knowledge to shave several hours off my time. Once you are done, it is time to take it to a good alignment shop that has some experience with classic cars. Tell them you have done the Shelby modification, as it changes the alignment specs. After that, all you can do is hit the closest highway ramp and see how your cat sticks to the pavement.